Bernadetta
Modern, Clean and Responsive WordPress Theme
Introduction and Features
Bernadetta is a multipurpose WordPress theme with custom layouts. We recommend it as a business portfolio theme. With this theme it is possible to:
- Create dynamically various aspects of the page, like portfolio, testinomials, features and parallax background sections.
- Use the theme on various screen devices.
- Utilize full Retina devices support.
- Use many widget areas.
- Display Featured posts anywhere.
- Large selection of Google Fonts.
- Create a beautiful blog with Masonry layout.
- Integrate the theme with various free and commercial plugins.
- Have the possibility to enable AJAX comment posting.
- Enjoy its fresh and accessible look and feel.
- and more...
In this documentation we will cover the necessary steps to use this theme effectively.
Installation
This theme is installable like any other WordPress theme. It suffices to follow these steps:
- Download the latest version of Bernadetta and extract the zip file in the 'wp-content/themes/' directory of your WordPress instance. This can be usually achieved using a FTP client to access your WordPress instance files.
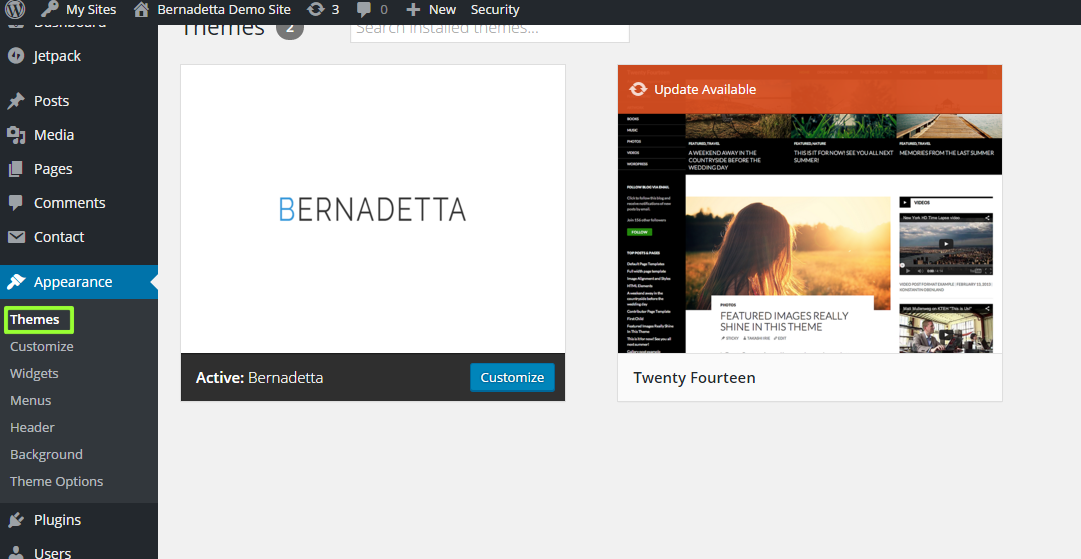
- Activate the theme on the 'Appearance » Themes' page in your WordPress administration backend, see the image below.
For more detailed instructions about installing a WordPress theme please refer to https://codex.wordpress.org/Appearance_Themes_Screen.
Advice: Perform a backup of your WordPress database before activating any new WordPress them or plugin. If something went wrong, you could then safely revert to your previously database backup.
Post Installation Steps
After the theme is successfully installed and activated, a notice should be displayed in the administration area - the theme wants to install required plugins and optional plugins which are recommended to install as well.
See the image below. The Bernadetta theme requires the following two plugins: Shortcodes Ultimate and Options Framework. The following two plugins are recommended:
WP Retina 2x and WP Ajaxify Comments.
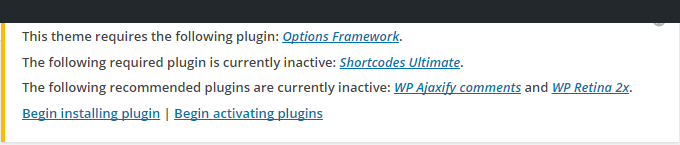
Notice: The output of the window may wary depending on which of the required/recommended plugins are already installed on not.
We want to install and activate all these plugins. Click on Begin installing plugins, check all the plugins on the newly diplayed page and in the select box choose Install, resp. Activate.
After all the necessary plugins are installed we can continue setting these plugins:
- Shortcodes Ultimate and Options Framework need nothing to set.
- WP Retina 2x: Navigate to Settings » Retina » Advanced and make sure that the option Retina.js is selected. This option works the best with the theme.
- WP Ajaxify Comments: Navigate to Settings » WP Ajaxify Comments and check the field Enable plugin. Optionally fill other options like colors which will match your color scheme etc.
Theme Options
Assuming you installed the required plugins, the theme options can be found on the page Appearance » Theme Options. The options are divided into several sections:
General Settings
- Logo. Here you can upload your custom logo and logo in high resolution (this is for Retina displays).
- Favicon. Here you can upload your site favicon.
- Copyright text. The copyright text is displayed in the last footer of all pages.
- Blog page. Here you can set various settings for the Blog page. See the next section for creating the Blog page.
- Header on Blog. Here you can upload the main background header on the top of the Blog page. You can upload high resolution version of the image as well. The image can be displayed in form of a parallax background, if you choose to. If you check this option, set also the height of the header which is usually slightly smaller than the image itself. For example, if the image height is 700 px, set the header height to approx. 600px.
- Pages. Here you can set default settings for the all the pages.
- Default header of pages. This is similar to header on blog, but it works for pages. The settings are considered default and can be overriden on each page in the admin section.
Design Settings
- Base font. Select the font for your site. A preview of the font is displayed below this field after the font has been selected.
- Latin extended. If you use extended Latin characters on your site, check this field.
- Base colors. There is a default color scheme used on all the pages. Here you can override it.
- Link colors. Optionally change the colors for links.
Custom CSS
Here you can set custom CSS styles for the site as well as for individual resolutions.Social Networking
Here you can set social networking links which will be displayed in the last footer. If you don't want to use any of the fields, just make them clean without any value.Additional code
Here you can set additional code like custom Javascript to be used in the header section of the page or in the footer section. This is useful for integrating other party JS files like Google analytics etc.Header Widget Areas
Here you can specify options for each header widget area. There are 8 header widget areas in the theme, 1st the most top and 8th the most bottom. Each header widget area can be- hidden-xs, if you want the widget are to hide on the extra small devices.
- full width, if the widget area's container should cover full width of the browser.
- only one item, if there is to be only one widget covering the container width. Otherwise, there are four widgets.
- margin top and margin bottom sets the corresponding margins.
Header Widget Areas
The same rules apply as in the case of Header Widget Areas, nevertheless the options are for footer areas.Creating the Blog and Home page
Creating the Blog page
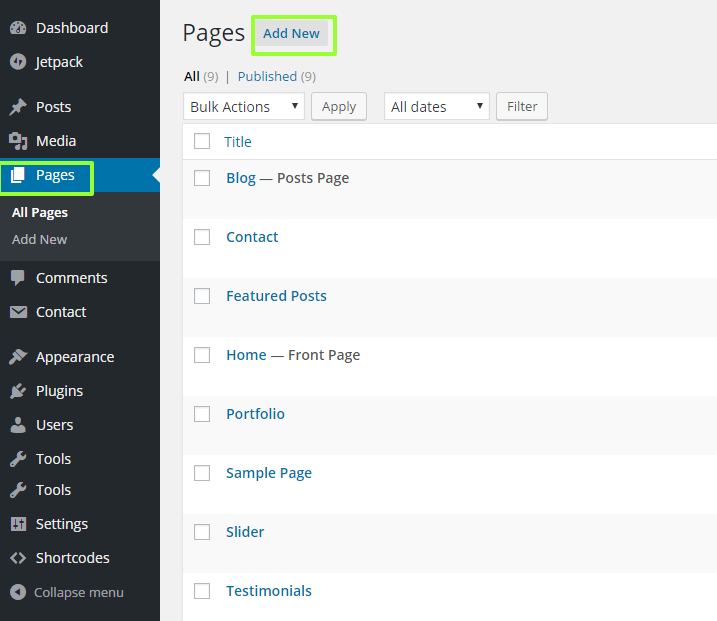
Creating the Blog page is easy. Navigate to Pages and click Add New, see the image below.
In the new opened window choose a title for your blog page, e.g. Blog. and click Publish.
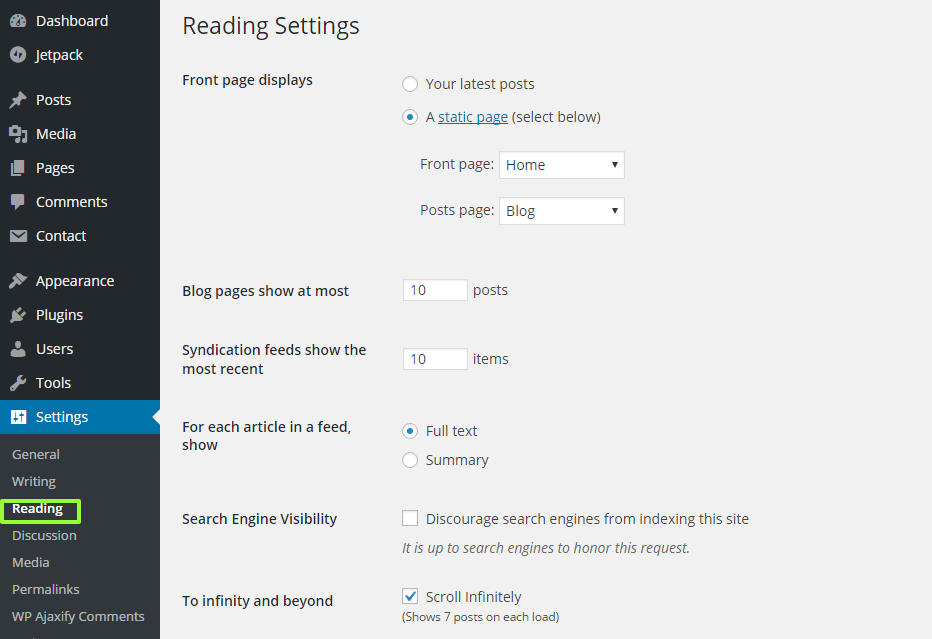
Next navigate to Settings » Reading and change the option Front Page Displays to A static page. In the select option for Posts page choose the newly created blog page.
Save the changes.
Creating the Home page
Creating the Home page is similar. Navigate to Pages and click Add New, see the image below.
In the new opened window choose a title for your home page, e.g. Home. Important is to select the template to Home Page, see the image below.
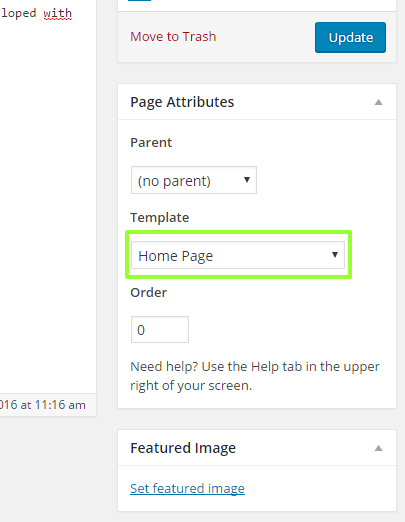
Click Publish.
Next navigate to Settings » Reading and check that the option Front Page Displays is set to A static page. In the select option for Front page page choose the newly created Home page.
Save the changes.
The Bootstrap Grid
The theme uses Twitter Bootstrap framework for its numerous advantages. One of the main advantage is organizing the content in a 12 columns grid. It is fully responsive.
The grid is divided into rows which are divided into columns. Here is an example from the official Bootstrap site:
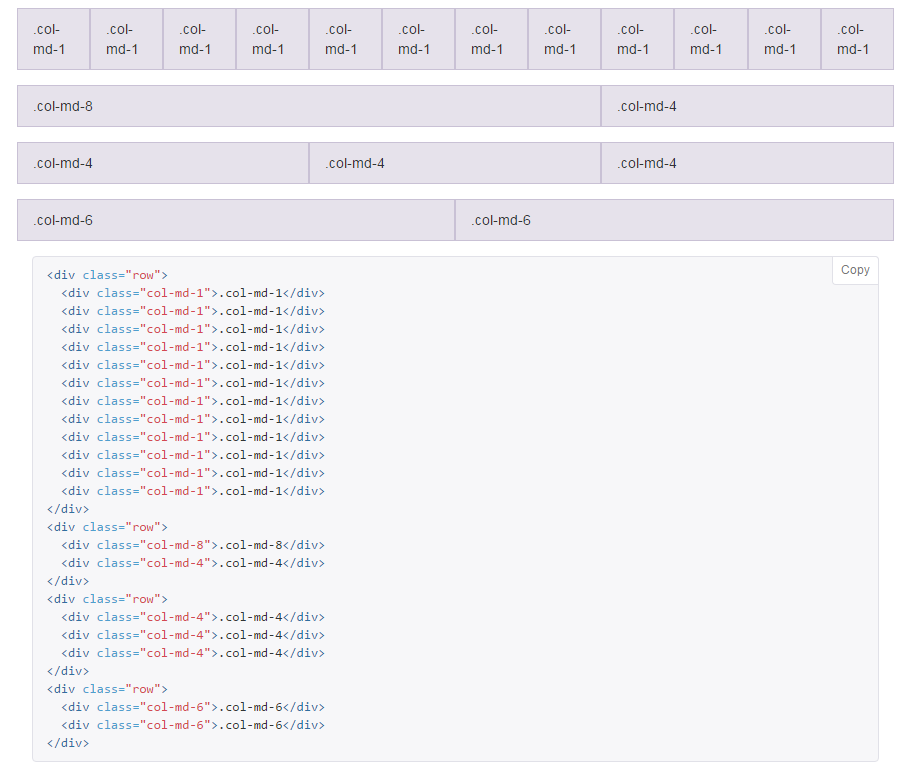
In the example above, there are four rows in the grid as it can be seen according to the image and the code below. On a medium sized device, we can have
together 12 elements of columns with CSS class col-md-1 in one row. Or we can have two equal sized columns taking each a half of the row if we mark
the column classes col-md-6, etc. The desired layout can be achieved by organizing the content into such columns and rows.
For more information about Bootstrap, please visit http://getbootstrap.com/. For more information about the grid, see http://getbootstrap.com/css/#grid.
Shortcode System to Create Dynamic Sections
The theme uses the plugin Shortcodes Ultimate which is a free yet very powerful plugin. With this plugin you can easily configure special shortcodes, which can be inserted anywhere in any page, post or widget. Shortcodes can be seen as an encapsulation of more complex PHP and HTML code. More information about shortcodes can be found here: https://codex.wordpress.org/Shortcode.
You can use any of the shortcode which the plugin Shortcodes Ultimate offer or you can use additional shortcodes from the theme.
Let's say we want to edit our home page which we created in one of the previous sections. In the page editor, we can trigger the shortcode dialog by clicking the Insert Shortcode button. If you dont't see this button,
check if Shortcodes Ultimate is installed and activated. Once you click on the button, a dialog appears as in the image below.
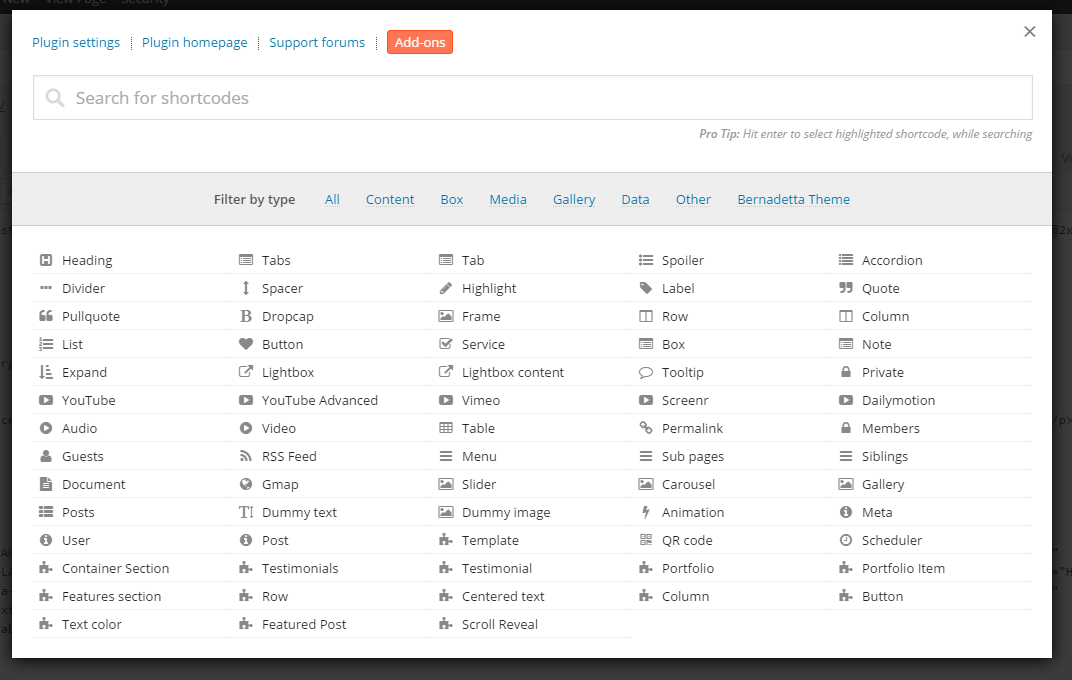
To get help about the shortcodes provided by the plugin itself, read the plugin documentation at the plugin homepage: http://gndev.info/shortcodes-ultimate/. However, all the shortcode names should be self-explanatory.
To see the additional shortcodes provided by the Bernadetta theme, you can filter them in the dialog. Just select Bernadetta Theme in the field Filter by type. Let us now briefly examine all the theme shortcodes.
Container Section
This shortcode adds a section, possibly with a background image. It can be full width (ie fluid) or fixed. You select Background Image, High Resolution Image for Retina display. Then there is a checkbox to enable parallax scrolling with the used image. You can configure if the section is fully centered, full-width, you can set the top and bottom margins of the section. You can set background color, for example if you don't want to use image. Finally in the content field you fill the content of the section. Alternatively, skip filling this field and click Insert shortcode. You have the option to fill the content in the shortcode after it's inserted. Here is an example from the theme demo - the first section with the home page slogan:[su_section image="http://localhost/bernadetta/wp-content/uploads/sites/2/2016/03/main_home1.jpg" image2x="http://localhost/bernadetta/wp-content/uploads/sites/2/2016/03/main_home1@2x.jpg"] [su_scroll_reveal] <h1>Share Your Values</h1> <h2>And Let Business Grow</h2> [/su_scroll_reveal] [/su_section]
Notice how the shortcodes have similar semantics to HTML tags and how they can be even nested.
Scroll Reveal
In the last example we used another shortcode called Scroll Reveal. This shortcode simply makes it's content to reveal as the page scrolls down, when the element becomes visible.
Testimonials and testimonial
These two shortcode adds a testinomial section with individual items. All the fields should be self-explanatory.
Here is again an example from the the demo site:
	[su_testimonials margin_top="58"]
		[su_testimonial image="http://localhost/bernadetta/wp-content/uploads/sites/2/2016/03/testimonial3.jpg" image2x="http://localhost/bernadetta/wp-content/uploads/sites/2/2016/03/testimonial3@2x.jpg" text="I love working with this company. They saved me lots of money by integrating their customized solutions." name="Dominic Robinson, Senior Manager and CEO"]
		[su_testimonial image="http://localhost/bernadetta/wp-content/uploads/sites/2/2016/03/testimonial2.jpg" image2x="http://localhost/bernadetta/wp-content/uploads/sites/2/2016/03/testimonial2@2x.jpg" text="Their products are simply great, I can't recommend more. I also appreciate student discounts." name="Rachel Carter, student"]
		[su_testimonial image="http://localhost/bernadetta/wp-content/uploads/sites/2/2016/03/testimonial1.jpg" image2x="http://localhost/bernadetta/wp-content/uploads/sites/2/2016/03/testimonial1@2x.jpg" text="I've been working for them for more than five years as external frontend developer and I really like the technologies they use." name="Patrick Power, Senior Frontend Developer"]
	[/su_testimonials]
Portfolio and Portfolio Item
Again, the shortcode attributes should be self-explanatory. Here is a snippet from the theme demo site:
	[su_scroll_reveal]
		[su_portfolio margin_top="58" margin_bottom="58"]
			[su_portfolio_item category="corporate" image="http://localhost/bernadetta/wp-content/uploads/sites/2/2016/03/portfolio1.jpg" image2x="http://localhost/bernadetta/wp-content/uploads/sites/2/2016/03/portfolio1@2x.jpg" image_type="large" title="Our Goals"]We never give up and slowly move day by day towards our goals.[/su_portfolio_item]
			[su_portfolio_item category="mobile" image="http://localhost/bernadetta/wp-content/uploads/sites/2/2016/03/portfolio2.jpg" image2x="http://localhost/bernadetta/wp-content/uploads/sites/2/2016/03/portfolio2@2x.jpg" image_type="small" title="Our mobile apps rock!"]Our mobile apps have been found amazing by our clients.[/su_portfolio_item]
			[su_portfolio_item category="web" image="http://localhost/bernadetta/wp-content/uploads/sites/2/2016/03/portfolio3.jpg" image2x="http://localhost/bernadetta/wp-content/uploads/sites/2/2016/03/portfolio3@2x.jpg" image_type="small"]We approach web design like art. Every element must be carefully positioned and crafted with great design skills and passion.[/su_portfolio_item]
			[su_portfolio_item category="corporate" image="http://localhost/bernadetta/wp-content/uploads/sites/2/2016/03/portfolio4.jpg" image2x="http://localhost/bernadetta/wp-content/uploads/sites/2/2016/03/portfolio4@2x.jpg" image_type="small" title="Our team simply works"]We are a team of talented web designers and web developers.[/su_portfolio_item]
			[su_portfolio_item category="security" image="http://localhost/bernadetta/wp-content/uploads/sites/2/2016/03/portfolio5.jpg" image2x="http://localhost/bernadetta/wp-content/uploads/sites/2/2016/03/portfolio5@2x.jpg" image_type="small"]Our web applications are secured on all layers.[/su_portfolio_item]
		[/su_portfolio]
	[/su_scroll_reveal]
Features section
Snippet from the demo site
	[su_scroll_reveal]
		[su_features feature1title="EASY AND POWERFUL CUSTOMIZATION"
			feature1icon="fa-cog"
			feature1text="Lorem ipsum dolor sit amet, consectetur adipiscing elit. Praesent tempor porttitor."
			feature2title="CONFIGURABLE PAGE LAYOUTS"
			feature2icon="fa-columns"
			feature2text="Lorem ipsum dolor sit amet, consectetur adipiscing elit. Praesent tempor porttitor."
			feature3title="HTML5 AND FULLY RESPONSIVE" feature3icon="fa-desktop"
			feature3text="Lorem ipsum dolor sit amet, consectetur adipiscing elit. Praesent tempor porttitor."
			feature4title="GREAT CUSTOMER SERVICE" feature4icon="fa-user" feature4text="Lorem ipsum dolor sit amet, consectetur adipiscing elit. Praesent tempor porttitor."
			image="http://localhost/bernadetta/wp-content/uploads/sites/2/2016/03/tablet_mobile.png" image2x="http://localhost/bernadetta/wp-content/uploads/sites/2/2016/03/tablet_mobile@2x.png"
			background_color="lightest_gray"]
		[/su_features]
	[/su_scroll_reveal]
Row, column
These shortcodes insert the Bootstrap row and column, respectively.
For example:
	[su_bs_row]
		[su_bs_column class="col-md-12"]Hello[/su_bs_column]
	[/su_bs_row]
is equivalent to the following HTML code:
	<div class="row">
		<div class="col-md-12">Hello</div>
	</div>
Featured Post
This shortcode adds a featured post. This can be used as follows (borrowed from the theme demo site)
	[su_section image="http://localhost/bernadetta/wp-content/uploads/sites/2/2016/03/home_blog.jpg" is_paralax="yes" full_width="no" full_center="no" hide_background_xs="yes" background_color="lightest_gray"]

		[su_bs_row]
			[su_text_center]
				[su_scroll_reveal]
					[su_spacer size="58"]
						[su_text_color color="primary"]<h2>From Our Blog</h2>[/su_text_color]
						[su_spacer size="76"]
							<p>We believe that WordPress sites should be configurable in an easy way and still look great. Our themes have been carefully developed with our seasoned web development skills.</p>
						[su_spacer size="76"]
							<p><strong>Let's continue the journey together.</strong></p>
						[su_spacer size="82"]
				[/su_scroll_reveal]
			[/su_text_center]
		[/su_bs_row]

		[su_bs_row]
			[su_featured_post post_id="35"][/su_featured_post]
			[su_featured_post post_id="38"][/su_featured_post]
			[su_featured_post post_id="30"][/su_featured_post]
		[/su_bs_row]

	[/su_section]
High Resolution (Retina) Considerations
The theme Bernadetta is fully supporting high resolution devices such as Retina. This means that the theme must be able to serve for each image an image of double dimensions.
The site owner than needs to always upload two versions of the images: the standard image and the image twice as large.
For example, let's say we have an image in our code: <img src="./img/photo.jpg alt="" />. If the user is viewing our site on a Retina device and if there exists
the high resolution version of the image ./img/photo@2x.jpg, then the larger image is served. We always recommend to name the high resolution version of the image
with the '@2x' suffix after the image filename (up to the extension).
This feature has it's drawback in terms of performance - more data has to be transferred. If you don't want to use this feature, you can simply ignore the high resolution version of any image in the theme.
More information about high resolution devices can be found for example here: https://en.wikipedia.org/wiki/Retina_Display.
The theme handles all types of images. For post and page thumbnails the free plugin WP Retina 2x is used. It automatically generates the thumbnails of higher resolution. This also implies that you have to upload images in a reasonable high resolution in order to utilize this feature fully.
For other types of images, like logo, CSS background images or images resulting from the custom shortcodes, there is always a possiblity to upload a high resolution version of the image.
Features Added to the Post and Page Editor
There are two additional meta boxes in the post and page editor, as we can see on the image below:
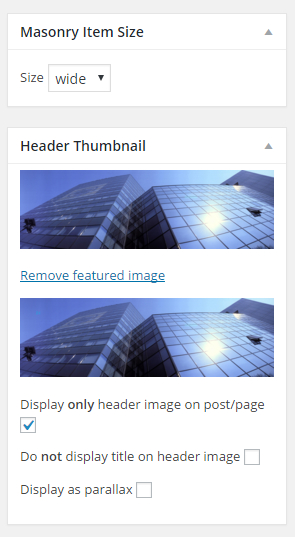
If we set a masonry display of the blog in the General settings, we can choose the dimensions of the current post on the blog overview page. Current options are medium and wide.
Each post and page can have a header thumbnail. This is usually a wide panorama image to better illustrate the page or post. Here you can set this thumbnail image as well as the same image in high resolution (is twice as large version of this image). You can specify if to display only header image. This means that the featured image will not be shown on the post or page, just this header image. You may choose to not display the title on header image if you don't want the page title displayed there. You may also enable or disable the parallax feature on this image. If parallax is turned on, you have to specify the height of the container for the image which is usually slightly smaller than the image itself. For example, if the image height is 700 px, set the header height to approx. 600px.