Thank you for using Avum
Created: Sept. 20th, 2010
By: George Kendros
If you have any additional questions beyond this help file, please don't hesitate to contact us.
HTML Structure
The theme is a single column layout with the main area being split into two columns, the body text and the sidebar. The page is split into 3 or 4 horizontal regions (depending on the page).
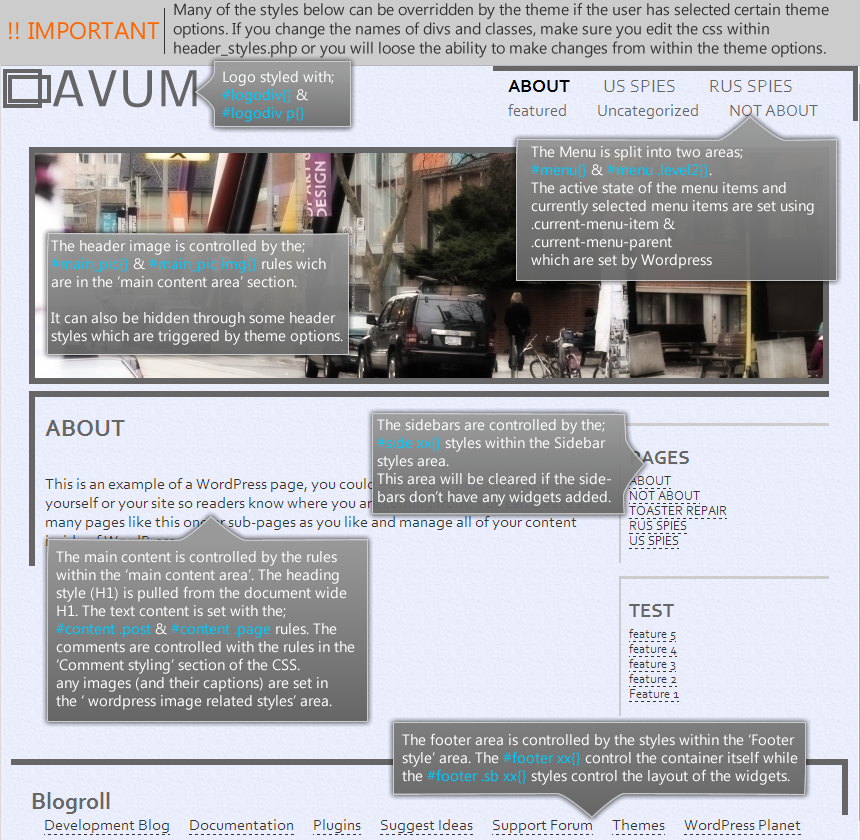
The first area is the #top_menu div. It houses the logo area (#logodiv) and the menu area (#menu). The menu itself is split into 2 divs (.menu-main-menu-container and .menu_level2).
The next area is optional, it's the region that houses the Featured posts slide (#feature-wrap and #feature inside).
The next area is the main content area. The top level is a variable height clearer div (.clearer-wide). Then it displays the header image (if it has been activated in the theme options) inside the div #main_pic. Then the content area is split with the main content on the left (#content) and the sidebar on the right (#side). The header image is actually inside the content div but it uses a negative margin to pull it up (which is why the variable size clearer div is used).
Finally there is the footer div (#footer) which calls wp_foot as well as serving a third widget area.
This image demonstrates a general outline of the HTML;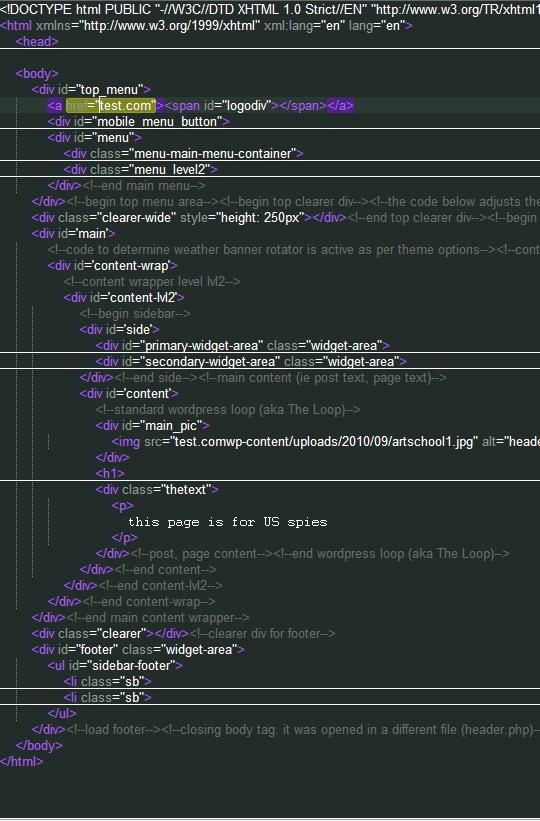
CSS Structure
The CSS (style.css) is broken up into 8 sections
- General Elements (body, a, img, etc.)
- Top menu and logo
- Banner rotator (ie. feature slider)
- Main content area
- Sidebar area
- Footer area
- Comment style
- General Wordpress related style (ie. image captions, image floats)
There are also IE specific css files. These merely fix basic IE bugs.
A file called mobile.css is used for styling the mobile version of the theme. All this stylesheet does is change the width of the main div, hide the sidebar and hide the menu (while showing the menu hide/show button)
Finally, there are some styles that are set in the document head by php. These styles include the colors of various elements (controlled by the color settings in the theme options) and the fonts (controlled by the font settings in the theme options page)
PHP files
The php files fall into 2 main categories, wordpress themes and helper files.
- header.php, index.php, page.php, sidebar.php, single.php & footer.php are basic wordpress theme files. They build the html structure and dynamically call the content.
- functions.php is a basic theme functions file; it overides the javascript, sets up the post thumbnails and a few other basic function. It also calls the external php file theme_options.php. This file sets the theme options and styles the theme options section.
- header_styles.php is loaded into the head of the regular page. It's the file that holds all the dynamically generated css rules (the ones that are controlled through the theme options)
- theme_options.php is included into the functions.php file. It sets up the theme options and controls their styling. It was split out from functions.php so it could be more managable and not cause functions.php to be too unwieldy.
JavaScript files
The theme uses very little javascript. It uses jquery 1.4 which is downloaded automatically via the theme options. There are 2 javascript files within the 'js' directory. uploadscript.js has the code which handles the uploads from the logo uploader in the theme options. script_main.js has 2 functions, it controls the banner rotator and it shows and hides the menu in the mobile theme (when the menu button is pressed).
Source Files
Artwork
By design the theme uses CSS almost exclusively for styling. The only external graphical assets loaded
by the theme are the header image files and the background image (which is just a solid color with a noise filter).
All files are created by me and all pictures were taken and post processed by me. Buying this theme gives you
the right to use the images within the theme (or a modification of the theme) but does not give the right to individually
distribute the images or resell the images individually.
Fonts
All fonts are dynamically loaded from Google font directory using their API. No fonts are included in this
theme.
Important tips
- Make sure that the main menu is only 2 levels deep.
- Make sure that menu items (ie pages, post categories) don't show up more than once in the menu. If they show up more than once, Wordpress has difficulty tracking the parent page
- Images inserted into posts/pages should have a maximum width of 555px. Images wider than this may be cropped.
- To show up in the 'Featured' scroller, posts must be added to a category named "featured"
Theme specification
Logo Size = 215px(wide) x 60px(high)
Post thumbnail size = 800px(wide) x 225px(high)
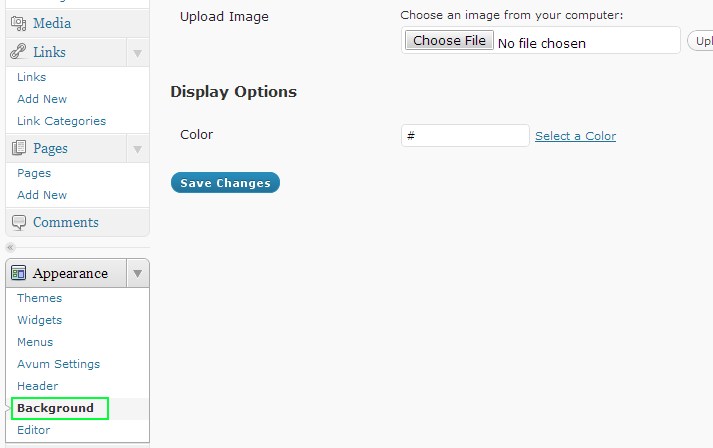
Changing the background
1) Select the "Background" option in the Appearance menu. The background uploaded
will then guide you through the process of uploading your new background image and will let you set repeat
and positioning options.
When editing the background, it's advisable that you edit the color settings from the Avum Settings
menu.
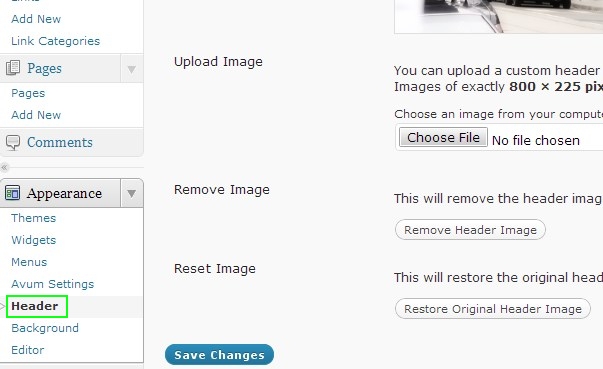
Changing the Header image
1) Select the "Header" option in the Appearance menu. The header uploader will then guide you through the process of uploading your new header image. This image will only be used if the current page or post does not have it's post thumbnail set as the theme supports post thumbnails. If the post thumbnail is set the page will use that as the header.
Logo Upload
1) Click the "Upload Image" button to initiate the uploader
2) Click the "Select Files" button to begin uploading your image.
3) Once the file is done uploading you should be presented with the dialog below.
If you don't see this dialog go the step #4.
Make sure your image is 215px(wide) x 60px(high). If your image exceeds these dimensions you can press the
"Edit Image" button below the image preview to enter the Wordpress image editor where you can re size your
image to the appropriate size.
When you're finished make sure you press the "Insert into Post" button and not the
"Save all Changes". If you press the save all changes button the image will not be uploaded.
Once done you can skip to step #5
4) If you didn't see the above image after the file was uploaded it was most likely
caused by uploading an image format other than a .jpg (ie. a png, gif or bmp)
You can still use the image, but you may not be able to edit it (depending on the image format). To use
the non jpeg image click the "Gallery" tab on the top of the image uploader. This will give you a list of
all uploaded images, you can click the "show" button beside the desired image and you will get the same dialog
as the image above. From here you can edit the image (if it's available for your image type) and press the
"Insert into Post" button.
5) Once everything is complete you should be returned back to the theme options page and the text box should now display the URL to the image you just uploaded. Now just scroll to the bottom of the page and press the "Save Changes" button.