“Austerity” Documentation by “vpthemes” v1.0
“Austerity - Flexible design allows theme to be used for corporate website, blog, portfolio and more in just a few minutes.”
Created: 05/29/2012
Last Edit: 05/29/2012
By: vpthemes
Thank you for downloading my theme. If you have any questions that are beyond the scope of this help file, please visit my support forum here.
Table of Contents
- Getting Started
- Theme Options Panel
- Custom Widgets
- Building Your Portfolio
- Page Templates
- Shortcodes
1) Getting Started - top
1-1) Theme Installation using the Administration Panel:
- Make sure your WP installation is up-to-date.
- Log in to the WordPress Administration Panel.
- Select the Appearance panel, then Themes.
- Select Install Themes.
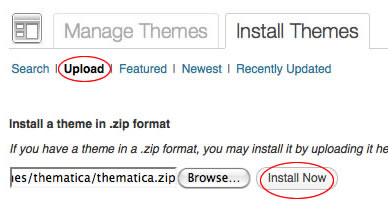
- Use Upload option and click on Browse icon to locate zipped copy of the theme on your computer.
- Click on Install Now button.
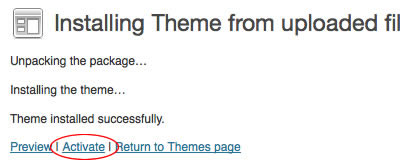
After the theme has been installed, you will need to activate it by pressing Activate link.
1-2) Setup Custom Menus:
-
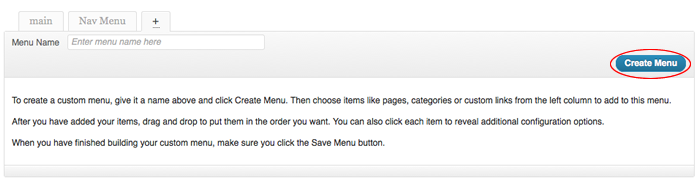
Go to Appearance -> Menus, Type a name for your menu in “Menu Name” field, for example “main” and click “Create Menu” then check “Automatically add new top-level pages” checkbox so when you create new pages it will be added automatically to the menu and you can edit them later.
-
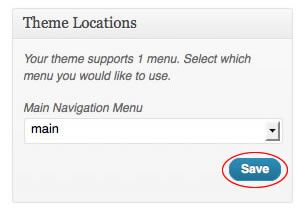
Under “Theme Locations” you can see the menu location that Austerity theme supports, under “Main Navigation Menu” select the menu that you have created and click “Save”.
2) Theme Options Panel - top
Austerity theme comes with simple and powerful theme options panel. It gives you all the options needed to control your site’s look and functionality. You can access the panel under Appearance -> Theme Options.
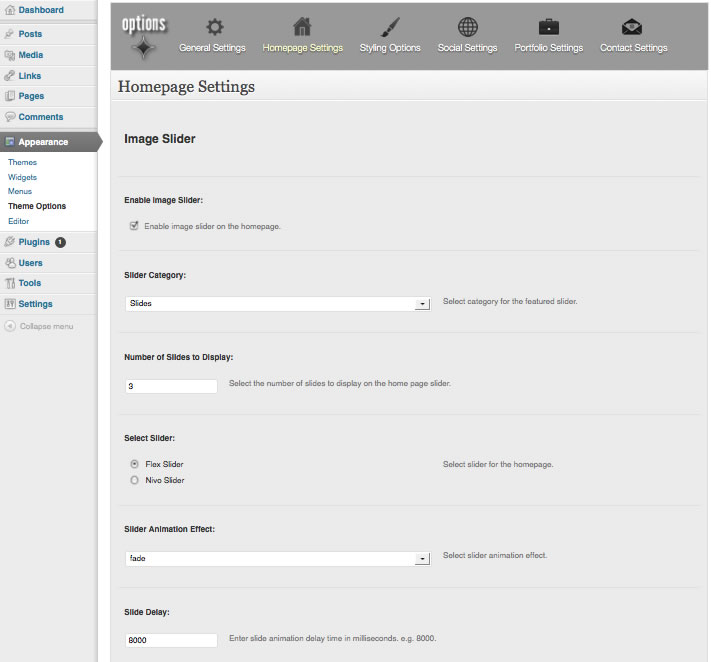
You have 6 main groups of settings:
- General settings.
- Homepage settings.
- Styling options.
- Social settings.
- Portfolio settings.
- Contact settings.
General settings - Takes all the options which affects all/most of pages in general:
- Branding control, like site logo, favicon and copyright note.
- Tracking code insertion.
Home settings - Takes all the options related to the home page elements:
- Customization options for all the home page sections like the image slider, services and call to action.
Styling options - Takes all the options related to fonts color and backgrounds:
- Customize background image and color.
- Customize colors for call to action section.
Social settings - Takes all the options related to the social media:
- Connect to your social media accounts like Twitter, Facbook and Linkedin.
- Configure sharing features to drive social traffic into your site.
Portfolio settings - Takes all the options related to the portfolio pages:
- Customize hover text and background colors.
Contact settings - Takes all your contact information options:
- Set all your contact info (address, phone, fax..etc) to be used in contact us page.
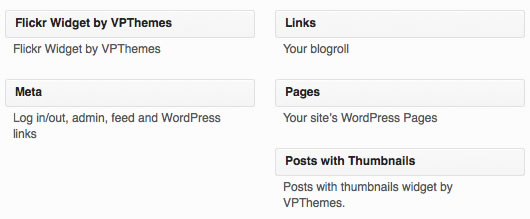
3) Custom Widgets - top
Austerity theme comes with 2 custom widgets:
- Posts with thumbnails (recent & most commented).
- Flickr photostream.
4) Building Your Portfolio - top
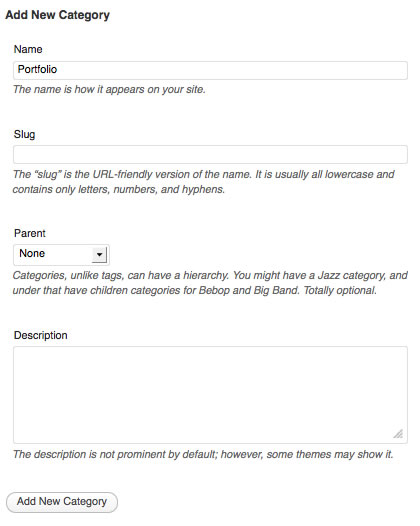
- Log in to WordPress Administration panel.
- Navigate to Posts panel and select Categories.
- Create new category name Portfolio. There are four pieces of information associated with each new Category: the name, slug, category parent, and description.
Start adding new posts under Portfolio category. Posts that belong to Portfolio category will appear on the portfolio page.
5) Page Templates - top
Austerity comes with several page templates:
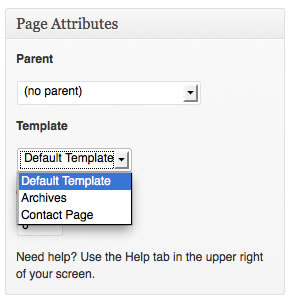
Default Template - The default page template displays a custom sidebar to the left and the page content to the right.
Archives Page - Displays useful archives for the blog e.g. latest 30 posts, archives by author, archives by category… etc, plus the any custom content from the editor.
Contact Page - Contains working PHP contact form with validation and displays your contact information, plus any custom content from the editor. This Page has some specific options in the theme options panel under Appearance -> Theme Options -> Contact Settings tab.
6) Shortcodes - top
Austerity comes with important shortcodes to build your content and add useful and cool stuff to your pages. You can use shortcode generator to insert shortcodes with fast and ease. In the visual editor of add/edit page/post where you will find vpthemes shortcodes button.

Once again, thank you for downloading this theme. As I said at the beginning, I'd be glad to help you if you have any questions relating to this theme.
VP Themes